Tuesday, 3 June 2014

Following safe working practices - P3(c)

Hazard
The risk details
How to minimize the risk
Weather conditions
The weather can also impact on the shooting process, especially if we plan to shoot outside. If it’s raining, all the equipment and crew would be wet 
To check the weather forecast before filming, always have an umbrella and a bag for a camera
A lot of transport on the street 
Transport can lead to serious accident 
Need to remember about the traffic regulations and to  be sure that others know them as well. To be careful in town
Crime on the street
We are going to shoot our film in town, where a lot of people are, including thieves. So there is possibility that someone can steal expensive equipment, i.e. camera. 
To film in places where a lot of people are nearby in order to ask for help if something would go wrong.
Camera run out of battery while filming
If camera runs out during filming process, everything will be spoiled
Before filming we need to ensure that camera is fully charged and all the equipment work
Unsuitable clothes 
Wearing unsuitable clothes for the weather can cause illnesses 
Make sure all the actors are aware of weather conditions and what they need to wear for shooting process
Cast crew is not turning up 
Cast crew or production crew may not visit the shooting process, that will lead to waste of time
Explain the cast crew how it’s important to visit filming process, remind them when and where filming will take place.
Damaged equipment
Someone can drop the camera 
Be careful!!!

During the filming process a lot of problems might occur, for example, with actors, weather conditions and equipment.

1. Weather conditions might affect the whole filming process. The name of the song is 'Happy' and this means that bad weather would be inappropriate at all as it would destroy the idea of our video. If it's raining, some of the actors might refuse from taking part in the shooting process and the equipment might be also damaged by the rain. It would be also hard for the actors to show happiness as the weather usually influences on the mood of people. In order to minimise the risk we checked the weather forecast every time before shooting. Fortunately, we didn't face with this problem. Our shooting process took place on nice and sunny days. You can see it on the screenshots from the video below:


2. Many transport on the street could lead to the accidents. Our crew and equipment could be damaged. However, we didn't face this problem. We made sure everyone knows the safety rules, and we were walking only on the pavements, where there are no cars.


3. Cast Crew is not turning up - The problem with actors might have occurred. Not all of them might be punctual enough, they can be late for shooting process and this might result in delays of the project. Some actors might even forget and miss the filming. This would lead to wasting of time of everyone and will damage the shooting process.  Fortunately, we've managed successfully with organising our crew as we have explained them how important it is.

4. Camera is running out of battery - We didn't have this problem as we made sure that our camera is fully charged before going to shoot.

5. Also one more problem could occur that I haven't discussed in my risk assessment. In our school we have a limited number of cameras and we are not the only group who needs to film. In order to avoid the problems with equipment we had to book equipment earlier than other teams.

Following production process - P3(d)

During production process we have tried to follow our storyboard as much as we could. However, some of the shots in our initial storyboard have been changed as sometimes we simply couldn't do the shots we were going to do:

e.g. Shot of Nelly in the mirror when she is brushing her teeth (bathroom) - We live in the boarding school and the size of our bathroom doesn't let us to make this kind of shots. The mirror in the bathroom is very small so it was impossible to film. Every time we were trying to shoot it, director could be seen in the mirror behind Nelly.


We have managed to change the shots quiet successfully and this is what we've done:

1. We have slightly changed some shots in the beginning of the video. It was planned that Nelly will be brushing her teeth in the mirror but instead we've decided to shoot how she is looking at her self in the mirror before going out. Instead of moving her magnit from the boarding house to town, we just have filmed how she is opening the door. Also we have made the decision to use taxi instead of bus as it would be time-consuming to wait for a bus. We didn't want to waste our time and that's why we have chosen taxi.


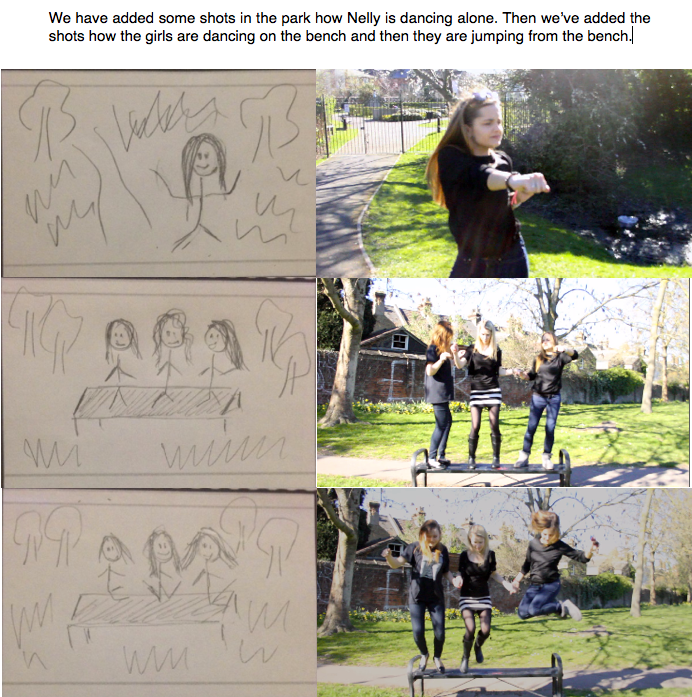
2. We have added a lot of other shots that were made in town. In order to do them efficiently without any problems we have drawn what are we going to film. This is what we've got:


At the end of the video we have added the shot how Nelly is waking up to show that it was just a dream.


Logging rushes and creating an edit decision list - P4(a)

Firstly I've set up a project in the Adobe Premiere Pro.

This video has a high definition format 1080p. It boast the 1080 line resolution - 1920x1080px. 1080p format will be available for sources such as DVD formats, HD- DVD and Blu-Ray. The quality improvement 1080p will provide over the high-definition formats will be much smaller than the upgrade from standard to high-definition. It may be marketed as much more likely to be demanded by consumers waiting the very best high-definition content.


This screenshot shows the last step of setting up the project in Adobe PremierePro. The chosen video format is HDV 1080p24.

After I've set up the project, I've logged all the rushes I've got from the shooting process. It's really useful to name all the rushes as it'll make it easier in the future to make the decisions on the shots I'm going to include in the video. As all the rushes will be logged, it will be less time-consuming to find the necessary shot among many unnamed rushes.

Below you can see the screenshots of how I've changed the names of the rushes.


After I've named all the rushes I've added them to my project. These screenshots show that all my rushes are renamed in my project.


Monday, 2 June 2014

Producing and reviewing an off-line edit - P4(b)


The timeline panel is where your video takes shape. By dragging items from the project panel or source monitor and placing them in the desired order, you create a sequence of clips and events which play in the timeline from left to right.

In timeline, we are able to adjust edit points, making clips shorter or longer, or stretch them over time. There we also can create multiple layers of video, e.g. titles, superimposed images, etc., multiple layers of audio, e.g. voiceovers, music, etc. We are also able to add transitions, filters, special effects. When the editing have been finished, we can play the timeline back in real time or export it in a variety of formats.

Below you can see my timeline where I’ve put all my videoclips in order, according to my storyboard and the changes I’ve described in ‘the following my production process’. The names of my shots reflects what is happening in there. This timeline is without applying any effects yet.


On this screenshot you can see that the name of the show which is playing reflects what Nelly is doing. The shot name is ‘Waking Up’ and we can see that Nelly is not sleeping anymore, she is waking up.


The screenshot below is another example of the names of the shows have been set correctly. The name of the shot is ‘Taking Jeans’ and we can actually see it.


Continuity editing is the predominant style of film editing and video editing in the post-production process of filmmaking of narrative films and television programs. The purpose of continuity editing is to smooth over the inherent discontinuity of the editing process and to establish a logical coherence between shots. This is a style of editing that requires the director to try to make the film reality as much like the audience’s reality as possible. This means the film is trying to recreate what the world around us is and trying to make it easier on the audience to comprehend and understand the action happening on the screen.

Continuity editing of my video is shown below. 

1. We can see that Nelly is taking her jeans in the first shot and in the second shot she is putting them on.


2. Here we can see that Nelly is coming down form the stairs to the exit of the main building of school, than we can the main entrance of school from outside and then Nelly is coming out from the door of the main entrance.


Some of my shoots were really long and I needed to cut them. Cutting helps to make the pace going faster so the audience wouldn’t be bored by watching one shot for a long time.

In Adobe Premiere Pro there is a special tool which is called ‘Razor’. In order to split the video in two or remove the segment in the middle of the clip, Razor tool might be used. It’s called a razor because in the traditional film editing process a tape was literally sliced with a razor blade to remove unwanted pieces of the film or rearrange segments of a film. 

To do the cuts in Premiere Pro I had to click on the Razor Tool in the Tool palette. Razor tool is an item that looks like a little razor blade. Then I just clicked on a clip at the point where I wanted to cut it. Then I clicked on the Selection tool in the Tool palette so I could select the segment to move it or to delete it (by pressing the delete key).


The first tool is a Selection Tool. The 6th tool is a Razor Tool.


Applying appropriate visual effects - P4(c)

Cross dissolve is a useful transition effect for video editing. To add a transition between clips, such as a cross dissolve so the first clip gradually fades out as a second clip fades in, I had to go to the Project pane and click on the tab for Effects. Then I selected Video Transitions to see a set of folders that have all the different transitions that are available.  I opened the Dissolve folder and saw the Cross Dissolve transition listed there.
To add the transition between two clips in my Timeline sequence, I positioned my playhead between two clips, then clicked on a transition like the cross dissolve, held down my mouse button, dragged the transition to the Timeline and released it when positioned between the two clips.


You can see a gray area added between the clips, which is the transition.


Dip-to-White transitioncross-fading first the outgoing clip into the white, and then fading in the incoming clip from this white colour. I found the dip-to-white transition in the folder 'Dissolve' (Video Transitions).


Additive Dissolve: Adds the two clips so that the first clip fades out and the second fades in. It's also located in the folder 'Dissolve' in Video Transitions.


Colour Corrections.

Auto color and auto contrast:

I've decided to try first the auto effects as it is the easiest way to correct the colours and contrast. When I applied these effects to my clips, I've found them really appropriate for my project. The colours and contrast have been corrected automatically, and I've found my clips better than original ones. I went to the folder Video effects and them to the folder Adjust, where Auto Color and Auto Contrast are located. Then I've applied them to my clips in the same way as applying any other effects. 


Below you can see the difference of clips with and without auto corrections. As you can see the colours are much more brighter. 


Another editing technique I've used was adding the titles to the start of the music video.


First I positioned my playhead over the approximate area in my Timeline sequence where I wanted the title to start. Then in the menu at the top I clicked on Title...New Title. Then I got a box with a lot of settings I can make when I'm creating my title. My title was displayed over the frame of my video clip where I positioned my playhead, so I could see how changes I'm making to the title settings look against the appropriate background. To create the title I clicked on the Type tool in the tools palette to the upper left, then clicked on the main screen and type the text for my title.


 A lot of music videos nowadays start with the name of the song and by who it's performed. I've decided to do the same in my music video.

First title, I've created was the name of my group 'MES inc'. 


Then I've applied Cross Dissolve effect to my title:


My second title was the name of the song and by who it is performed: Pharrell Williams - Happy.

Then I've added Cross Dissolve Effect to the end of the shot as you can see in my timeline:


Sunday, 1 June 2014

Linking Audio to visuals and applying audio effects - P4(d)


Linking audio to visuals is very important in the music video. Firstly, I’ve downloaded the track ‘Happy’ by Pharrell Williams from the internet and imported it to my project. Then I’ve put it on the ‘Audio 2’ line in my timeline. This has allowed the music to appear in the video.


It’s very significant for audio to be matched with the shots. I has tried hard to follow the script and to do the shots which would support the lyrics of the song. The main idea of the song is happiness that’s why the actors were trying hard to show how happy they are.


When I’ve finished my editing i have removed the initial sounds of my video clips as they aren’t needed and they are damaging the song which we have decided to use for the music video. I have done it by putting down the volume of audio in the effects control. This has helped me to get rid of the sounds that are in the background of the shots.